


 |
|
|
|
Update April 2020
![]()
www.percunivers.com
After having mastered these different concepts, take your first lessons or choose a path.
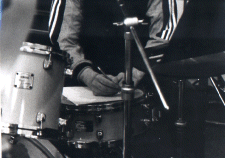
The first catch of sticks must remain very natural. Take the sticks, rectify if the position is too bad. The match grip also known as of timbalier because of his symmetry and on account of the convenience is used whatever the played style. It allows easier displacements on the drums. In spite of that the traditonnal grip remains very appraisal of certain jazz drummers, it then gets more sensitivity and the mass muscular brought into play is more significant what makes it possible partially to rectify unbalance between the two hands.
The drum when it is played while marching is inclined, the position of the left hand makes it possible to be put up with the angle of the drum. For the detail of the behaviour right hand see match grip.
Two ways to play :

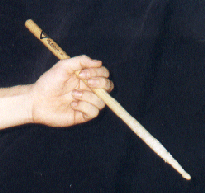
The bounce point is the point on the stick which allows a maximum of free bounces.
According to the type of sticks used this one will be ahead or behind
of the third of the stick.
Strikes described below are not there by chance. It is a question of
becoming aware that the drums are partly the study of the gesture.
These exercices could be understand as warm-up exercices emphasizes the
mechanical differences but also the differences of feelings, touched
and sonorities. This work can jointly be made with drum books like
Stick Control and the Agostini methods. Work in front of a mirror.
In all the cases the first thing not to neglect it is the impulse. The
first part of the gesture, that which takes along the stick to the
skin, is essential. All that will become after depends on the quality
of this impulse. This one must-to be honest and tonic. It is necessary
to put conviction at it.
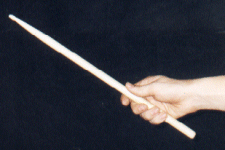
 The strokes are played with the wrist. It is about a full motion, the stick
starts of the high point (1),
runs up against the head (2)
and always goes up (3)
under the action of the wrist without assistance of the
bounce.
The strokes are played with the wrist. It is about a full motion, the stick
starts of the high point (1),
runs up against the head (2)
and always goes up (3)
under the action of the wrist without assistance of the
bounce.
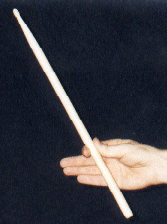
 Blocking, the strokes are played with the fingers. The gesture starts
of the high point (1),
opened hand, the fingers are closed again, the sticks runs up against the head, the
hand remains closed to block the sticks
close to the head (2).
This stroke is often associated with the wrist
for the first part of the gesture.
Blocking, the strokes are played with the fingers. The gesture starts
of the high point (1),
opened hand, the fingers are closed again, the sticks runs up against the head, the
hand remains closed to block the sticks
close to the head (2).
This stroke is often associated with the wrist
for the first part of the gesture.
 It is about the bounce, the first stroke is given starting from a high
point (1)
the fingers maintain the natural bounce (2)
of the stick on the head.
It is about the bounce, the first stroke is given starting from a high
point (1)
the fingers maintain the natural bounce (2)
of the stick on the head.
 It is about the buzz-roll. Press and crush the stick against the head
to obtain an indefinite number of very tight bounces
(1).
The pivot is done on the level of the elbow. The wrist remains rigid.
It is about the buzz-roll. Press and crush the stick against the head
to obtain an indefinite number of very tight bounces
(1).
The pivot is done on the level of the elbow. The wrist remains rigid.
 same as the first type but the stroke starts of the low point (1),
is raised (2)
and returns to its starting
point (3).
same as the first type but the stroke starts of the low point (1),
is raised (2)
and returns to its starting
point (3).
 First part of the Buzz-Roll.
The wrist remains rigid and the fingers hold firmly the rod (1),
the front armlever launches the unit (2).
First part of the Buzz-Roll.
The wrist remains rigid and the fingers hold firmly the rod (1),
the front armlever launches the unit (2).
 This stroke approaches the stroke of a whip, at the beginning the front
armlever launches the gesture (1),
the elbow goes up while moving away
on the side of the body, the wrist remained flexible accompanies this
one (2)
and the fingers finish while being closed again (3).
This stroke approaches the stroke of a whip, at the beginning the front
armlever launches the gesture (1),
the elbow goes up while moving away
on the side of the body, the wrist remained flexible accompanies this
one (2)
and the fingers finish while being closed again (3).
 Fingers, wrist, front armlever and arm released of all tensions (1)
can
be launched starting from the shoulder (2),
the fingers finish (3).
It is about a very full and very powerful stroke.
Fingers, wrist, front armlever and arm released of all tensions (1)
can
be launched starting from the shoulder (2),
the fingers finish (3).
It is about a very full and very powerful stroke.
Let us take the example of the ball from basketball.
Let us observe the ball which we project towards the ground. So that it
bounces it will be necessary to print to him a force with each one of
its passages between our hands. If we increase the intensity of this
force, the distance from its race will be larger or if we maintain this
distance constant it will spend less time to return to us between the
hands. Conversely if we decrease this force the ball spends more time
to return to us and, the distance from its race decreases.
In this example three parameters emerge: time, space and energy.
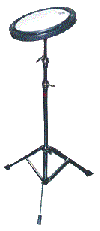 The following exercises, like all the other technical exercises, must
be played on the snare drum or a practice pad. And, especially, they
will have to be played in front of a mirror, to take care of a perfect
execution of the strokes.
The following exercises, like all the other technical exercises, must
be played on the snare drum or a practice pad. And, especially, they
will have to be played in front of a mirror, to take care of a perfect
execution of the strokes.
Variation of the three parameters which are : time, space and energy, allow a very rich sound pallet. Always to keep in mind these three parameters to include/understand and solve some difficulties of the instrument, and for always enjoying to play.


